 Pin It
 I discovered this rocket the way most good party tricks come about—through sheer desperation and a toddler's imagination. My nephew was obsessed with space that summer, and I had exactly fifteen minutes to transform a platter of cheese and berries into something that would make his eyes light up. The moment those strawberry flames caught the kitchen light, I realized I'd stumbled onto something that works for every age, every occasion, and every level of cooking confidence.
The first time I served this at a neighborhood gathering, an older woman pulled me aside and said it reminded her of vintage appetizer platters from the 1960s, which she loved. She was right—there's something playful and unapologetic about food shaped like something it isn't. That compliment changed how I think about putting effort into presentation, even when the recipe is simple.
Ingredients
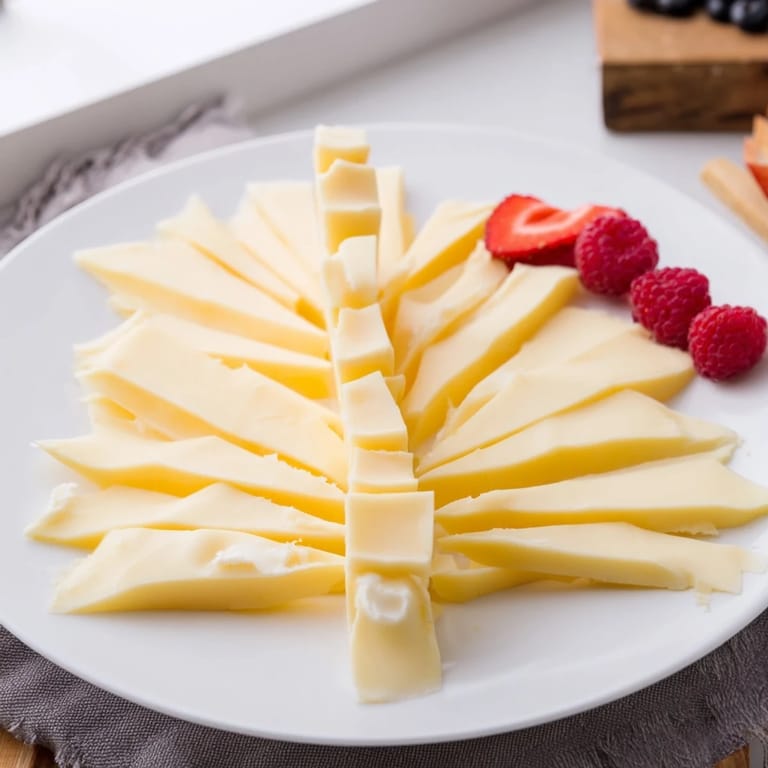
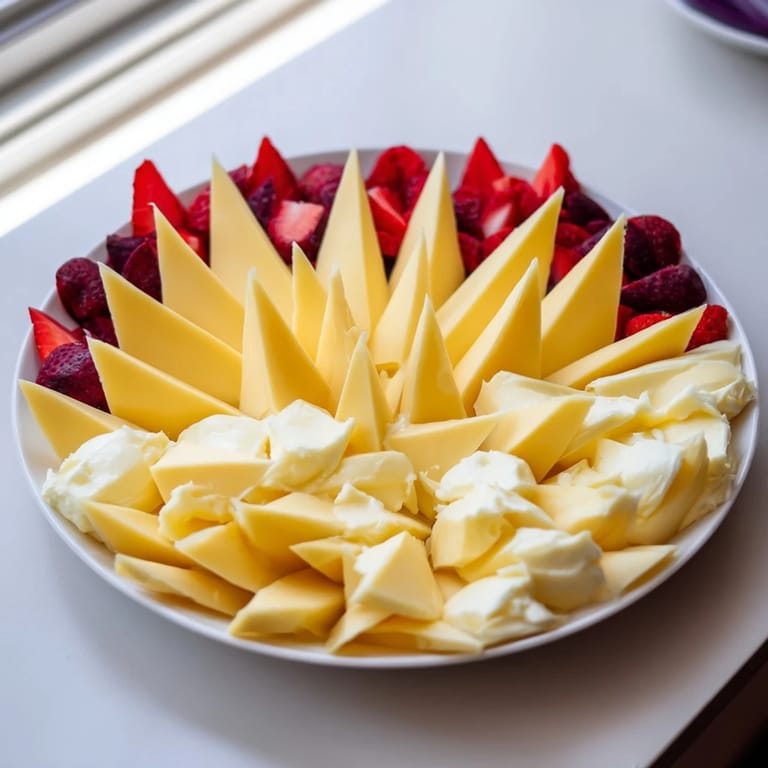
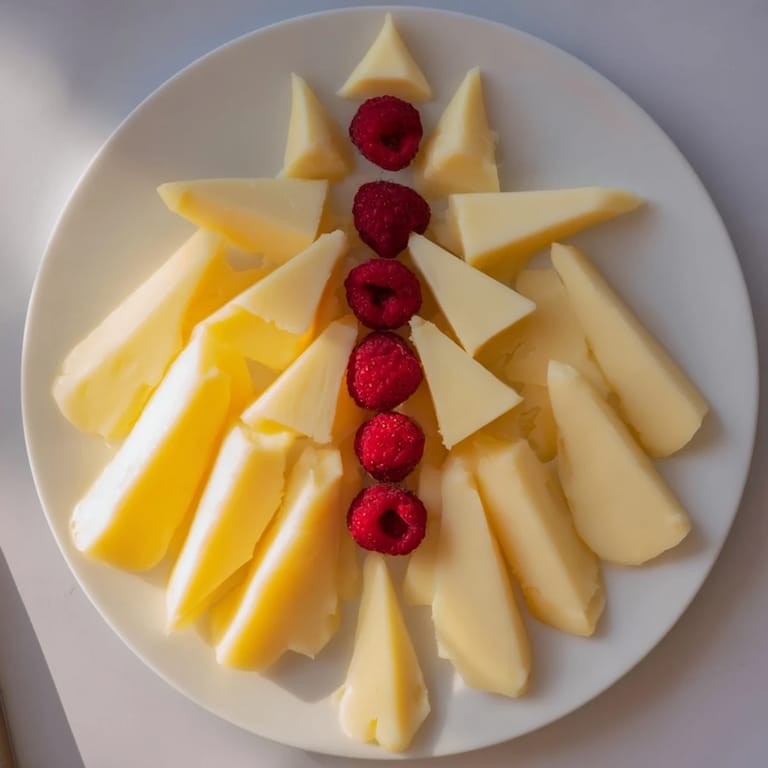
- Sharp cheddar cheese, cut into pointed wedges (200 g): The backbone of your rocket, and sharp matters because it has character that bland cheese won't provide—look for a deep golden color that suggests real flavor.
- Fresh strawberries, hulled and sliced lengthwise (200 g): These become your flames, and slicing them lengthwise gives you those dramatic pointed pieces that look intentional and fiery.
- Cream cheese (100 g, optional): Acts as the glue that holds your cheese wedges together without being noticeable—a tiny dab between pieces makes all the difference.
- Black olives, sliced (1 tablespoon): Your window portholes, adding visual interest and a salty counterpoint to the sweetness of fruit.
- Fresh mint leaves (1 tablespoon, optional): Adds a pop of green that makes the whole thing feel intentional rather than thrown together.
- Carrot sticks, thin (2-3): Your rocket fins—the angle matters more than perfection here.
Tired of Takeout? 🥡
Get 10 meals you can make faster than delivery arrives. Seriously.
One email. No spam. Unsubscribe anytime.
Instructions
- Build your rocket body:
- Arrange those cheese wedges in a long pointed formation on your platter, overlapping them slightly like scales. You're aiming for something that reads as a rocket shape from above, so don't overthink the geometry—wonky actually looks better.
- Add the adhesive:
- If your wedges feel wobbly, tuck tiny dabs of cream cheese between them to hold everything steady, working quietly so no one sees the scaffolding.
- Create your flame effect:
- Fan those strawberry slices out from the base of your rocket in an explosion of red and pink, overlapping them until it looks like fire frozen mid-blast.
- Add the details:
- Press olive slices onto the cheese body like windows, arrange carrot sticks as fins jutting out the sides, and scatter mint leaves wherever they need some green.
- Serve or chill:
- If you're doing this ahead, cover it loosely and refrigerate—the chill actually helps everything hold its shape better, and it also means one less thing to panic about right before guests arrive.
 Pin It
 My friend Sarah brought this to her daughter's kindergarten classroom snack day, and apparently the teacher asked for the recipe because the kids actually ate the fruit without negotiating or hiding it under napkins. That's when I realized this works because the fun of the shape makes you forget you're choosing vegetables and cheese over cookies.
Variations That Actually Work
The beautiful thing about this platter is that it's a template, not a rule book. I've made versions with gouda for a deeper color, with grapes instead of berries for a smoother curve, and once with mango slices that turned the whole thing golden. The core idea stays the same—you're just swapping in what you have or what matches your color scheme. Each variation feels completely intentional even though you're essentially just playing with what's in your fridge.
Serving and Storage Secrets
The best time to present this is when people first arrive and haven't eaten yet, because the visual impact hits harder when they're fresh. If you need it to last for a few hours at a party, keep it in the coolest spot you can find—not right next to the oven or sunny window. I learned this the hard way when mine started looking sad in the afternoon heat, but keeping it covered and chilled buys you real staying power.
Why This Becomes a Signature
Somewhere along the line, this platter stopped being a last-minute hack and became the thing people ask me to bring. Part of that is the silliness of it—adults still think rocket shapes are fun, even if they don't admit it right away. Part of it is that it costs almost nothing, takes almost no time, but somehow feels like you put thought into the gathering.
- Make it the centerpiece of your platter and let it be the conversation starter before anything else on the table.
- Double-check that your cheese wedges have pointed ends—those sharp angles are what read as rocket, not a random cheese pile.
- Remember that this doesn't need to be perfect to work; slightly messy actually looks more playful and honest.
 Pin It
 This rocket has taught me that food doesn't need to be complicated to feel special—sometimes the simplest things become memories just because you noticed them. Make it when you need something easy, make it when you want to see someone smile, or make it just because you feel like your platter deserves to take flight.
Recipe FAQs
- → How do I keep the cheese wedges stable in the rocket shape?
Use small dabs of cream cheese between wedges to help hold the structure securely during serving.
- → Can I substitute strawberries with other fruits?
Yes, try mango or orange slices for a different colorful flame effect beneath the cheese wedges.
- → What cheeses work best for the rocket body?
Sharp cheddar provides vibrant color and shape, but Gouda or Swiss can be used for variety and contrasting hues.
- → Are there suggestions for extra decorative elements?
Black olive slices create window details, while thin carrot sticks serve as rocket fins for added visual interest.
- → How soon should I serve this snack once assembled?
Serve immediately for best freshness and appearance, or cover and refrigerate until ready to present.