 Pin It
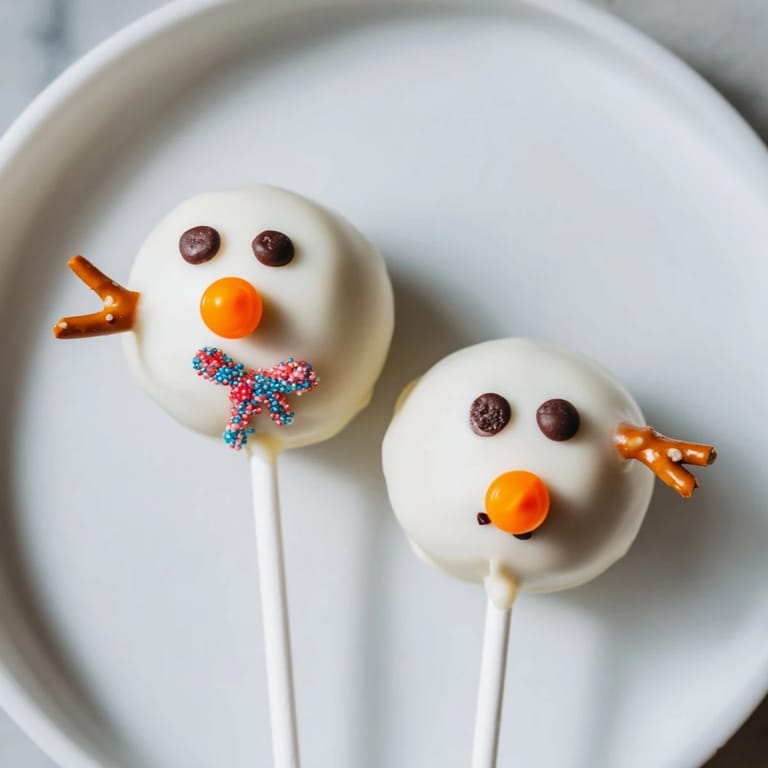
 My daughter came home from school with a craft assignment that made me smile—she had to bring a "snowy treat" for the winter party. I stood in the kitchen that afternoon, thinking about what would be special enough to excite a room full of second graders, when it hit me: snowmen they could actually eat. These Oreo cake pops became our little project together, and watching her face light up as we stacked the balls and added chocolate chip eyes made the whole thing worthwhile.
I remember setting up a little assembly line on the counter with my daughter, the white chocolate melting in the microwave while she carefully pressed chocolate chips onto each pop. There was something calming about the rhythm of it all, the quiet focus we both brought to decorating tiny snowmen on a cold December afternoon. By the time we finished, we had made way more than the assignment called for, and I realized I'd actually enjoyed every minute of it.
Ingredients
- Oreo cookies (36 total, about 1 standard package): The backbone of this recipe—don't skip the creamy centers because they add richness and help bind everything together into a smooth dough.
- Cream cheese (180 g or 6 oz, softened): This is what transforms crushed cookies into moldable dough that holds its shape perfectly when frozen.
- White chocolate or candy melts (350 g or 12 oz): Candy melts work better than melting bars if you want a smooth, quick-setting coating; they're more forgiving.
- Mini chocolate chips or black decorating gel: For the eyes and buttons—gel gives you precision, while chips create a charming rustic look.
- Orange sprinkle or colored icing: A tiny touch for the carrot nose, which honestly makes the whole snowman come alive.
- Pretzel sticks or colored fondant: Pretzel sticks are crunchier and add texture; fondant lets you customize colors and softness.
- Lollipop sticks: These hold everything together and make them fun to eat; get sturdy ones that won't bend.
Tired of Takeout? 🥡
Get 10 meals you can make faster than delivery arrives. Seriously.
One email. No spam. Unsubscribe anytime.
Instructions
- Crush the Oreos into crumbs:
- Pulse them in a food processor until they're the texture of fine breadcrumbs—you want no large chunks left. If you don't have a processor, seal them in a zip-top bag and go at them with a rolling pin; it's actually kind of therapeutic.
- Mix in the cream cheese:
- Add the softened cream cheese to the crushed Oreos and stir until you have a uniform dough with no streaks of cream cheese visible. It should feel smooth and slightly tacky, like cookie dough.
- Roll your snowman bodies:
- Make 32 smaller balls (about 2 cm) and 16 larger balls (about 3 cm)—these become the head and body of each snowman. Roll them gently between your palms; if the mixture is sticky, chill your hands under cold water first.
- Stack and stick:
- Press one small ball on top of each large ball, then insert a lollipop stick through the center of both layers so it goes all the way down. Place each one upright on a parchment-lined baking sheet.
- Chill until firm:
- Freeze for 20–30 minutes, or until they feel solid to the touch. This keeps them from falling apart when you dip them in warm chocolate.
- Melt the white chocolate:
- Microwave in 30-second bursts, stirring between each one, until completely smooth and pourable. Don't overheat or it'll get grainy and thick.
- Dip with confidence:
- Hold each pop by the stick and dip it into the melted chocolate, turning gently to coat all sides. Let the excess drip off for a few seconds, then place it upright in a styrofoam block or tall glass to set.
- Decorate while tacky:
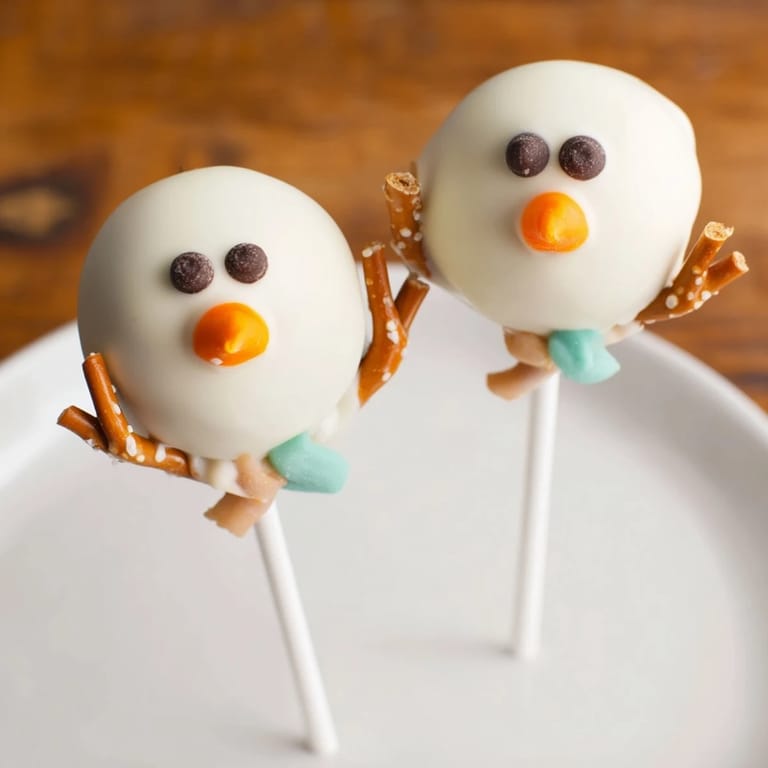
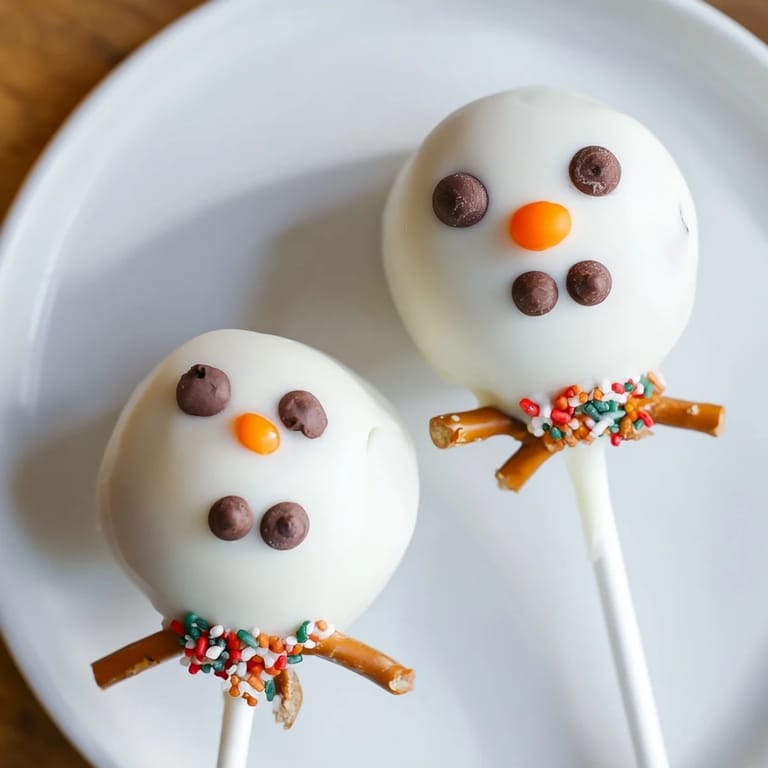
- Add eyes, buttons, and the nose while the chocolate coating is still soft and sticky—this helps everything adhere without extra glue. Work quickly but not frantically; you have a few minutes.
- Add the finishing touches:
- Once the chocolate sets, stick pretzel arms into the sides or wrap tiny fondant scarves around the neck to complete your snowman.
 Pin It
 Later that week, I got a photo from the teacher showing all those little snowmen lined up on the party table, and I realized my daughter had quietly told a friend they were homemade. There's something about food you make with your own hands that carries a different kind of joy, especially when it's shared with people you care about.
Storage and Make-Ahead Tips
These pops are actually better when made ahead—the flavors meld, and the texture becomes more fudgy in the fridge. Store them in an airtight container in the refrigerator for up to 5 days, and they'll be just as delicious on day three as they are fresh. You can even freeze them for up to 2 weeks if you want to make them well in advance of a party.
Decorating Ideas and Customization
Once you master the basic snowman, the fun is in experimenting with different looks. I've made them with red fondant scarves, added tiny hats from candy molds, and even tried using different colored icing to create little faces with expressions. The pretzel arms can be positioned at funny angles, and you can use edible markers to draw on scarves or add extra details if you're feeling creative.
Why This Recipe Works for Any Occasion
These aren't just for winter—I've made them year-round by swapping out decorations. They work for holiday parties, classroom treats, bake sales, or just because you want something cheerful on your dessert table. The base recipe is simple enough that even kids can help mix and roll, which makes them perfect for family cooking time or teaching someone how to make a dessert from scratch.
- Make them ahead of time and store them in the fridge so you're not rushed on party day.
- If decorating gel is hard to find, regular black icing in a squeeze bottle works just as well.
- For a shortcut, you can buy pre-made chocolate-covered pretzel sticks to use as arms instead of inserting them fresh.
 Pin It
 Making these cake pops turned out to be one of those small kitchen moments I didn't expect to treasure, but I find myself thinking about that afternoon often. There's something wonderful about creating something that's equal parts delicious and delightful, especially when it brings a smile to someone's face.
Recipe FAQs
- → What is the best way to crush Oreos for this dessert?
Using a food processor yields finely crushed Oreos quickly, but placing them in a zip-top bag and crushing with a rolling pin also works well.
- → How do I shape the snowmen for even coating?
Roll small and larger Oreo dough balls, stack them carefully, and insert a lollipop stick to keep the structure steady during coating.
- → What coating options can I use?
White chocolate or candy melts can be melted and used to coat the snowmen evenly, creating a smooth, festive finish.
- → How can I decorate the details on the snowmen?
Mini chocolate chips or decorating gel are ideal for eyes and buttons, while orange icing or sprinkles make a perfect nose. Pretzels or fondant add charming arms and scarves.
- → How should these treats be stored?
Store them in an airtight container in the refrigerator to maintain freshness for up to five days.